Introduction to Code Generation in RepreZen API Studio
The code generation features of RepreZen API Studio create the bridge between richly specifying an API and building systems that use that API properly.
A number of generators are built into the product and can be used immediately in any model project. Examples include (HTML) Documentation, Diagram, Swagger, JSON Schema, XML Schema, and many others. And since our goal is to make RepreZen’s unique approach to modeling as widely adoptable as possible, we will be adding more built-in generators in the future.
However, it is also possible — and relatively straightforward — to create and share custom generators for your own needs.
In this document we will cover basic concepts and see how to use code generation in RepreZen API Studio. We’ll cover how to perform common tasks using wizards and other features of RepreZen API Studio, and we’ll create a custom code generator to address a fictional but plausible requirement in a large enterprise.
We’ll finish with a brief run-down of some advanced features that will allow experienced Java developers to create their own powerful generators.
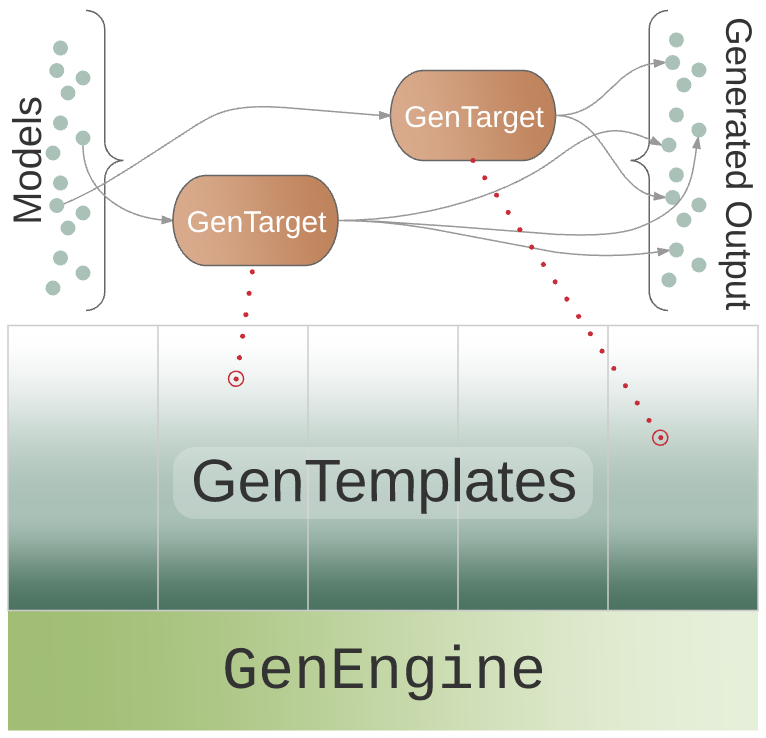
The Generator Architecture
This figure shows the main parts of the RepreZen API Studio code generation framework.
Components in this framework include:
- GenEngine
-
A GenEngine encompasses facilities built into RepreZen API Studio to support a specific code generation technology, such as a templating engine. RepreZen API Studio currently comes with a single GenEngine, which supports the Xtend templating language.[1]
GenEngines are not currently implemented in a way that makes it feasible for end users to create their own. We hope to provide GenEngines for other popular generation tools in the future.
- GenTemplate
-
A GenTemplate is an implementation of a code generator using a particular GenEngine. Each GenTemplate produces output for a specific purpose, in a form suited to that purpose. The generators that are built into RepreZen API Studio are all GenTemplates built using the Xtend GenEngine.[2]
- GenTarget
-
A GenTarget applies a GenTemplate to a model. When you create a GenTarget, it becomes part of the model project.
Executing a GenTarget causes the associated GenTemplate to be executed against the associated model, with the results appearing as files in the model project, in a folder specified by the GenTarget.
As stated earlier, RepreZen API Studio comes with numerous built-in generators. We can now state that with a bit more precision: RepreZen API Studio comes with a number of built-in GenTemplates, each based on the Xtend GenEngine. Likewise, when we stated that developers could create their own customized generators, that really meant that developers can easily create and use their own GenTemplates, also based on the Xtend GenEngine.
RepreZen API Studio Wizards
In this section we will walk through a few scenarios to introduce the wizards and other controls built into RepreZen API Studio that relate to code generation.
RepreZen Project
The first wizard you are likely to encounter in RepreZen API Studio is the RepreZen Project wizard, which is available by selecting RepreZen Project in the New menu.

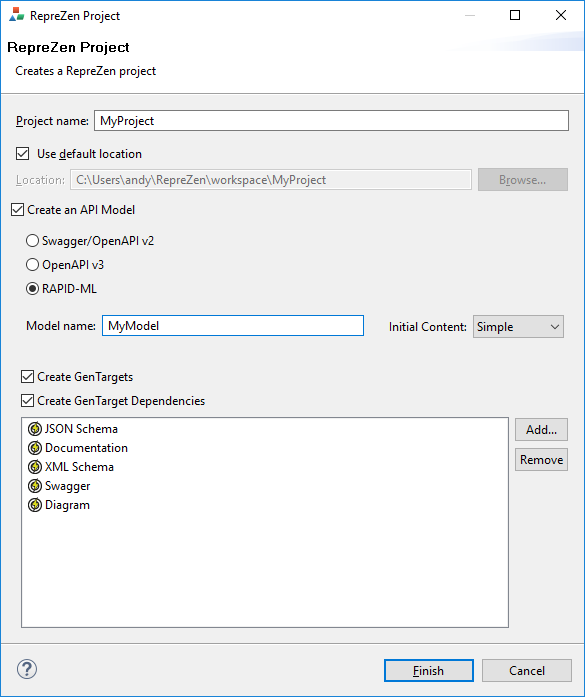
Note that we have selected the option to create a Swagger, OpenApiv3, or RAPID-ML Model as part of the project creation. We also have the opportunity to equip that model with an initial set of GenTargets by checking the "Create GenTargets" option. Which GenTargets? Those named in the box: JSON Schema, Documentation and a few others, in this example. You can use the Add and Remove buttons to change this list to suit your needs.
Once we click OK to crate the project, we can fully expand its folder tree in the Project Explorer:
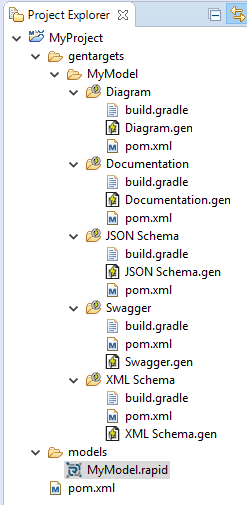
Within the MyProject project folder we see two top-level folders named gentargets and
models. Naturally enough, the MyModel.zen file, which is where we will define our model, landed
in the models folder, and we see all of our initial GenTargets in the MyModel sub-folder of
gentargets. The reason for the sub-folder is that each GenTarget applies to a specific model, and
there might be multiple models in a single RepreZen project. In this case, we only have a single model
named MyModel, and both targets apply to it.
Each GenTarget is represented as a folder with three files: build.gradle, pom.xml, and a .gen
file named after the GenTarget’s associated GenTemplate.
Executing a GenTarget
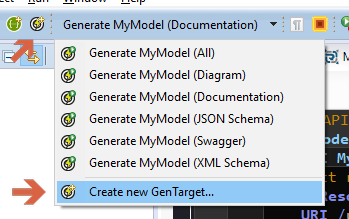
There are a couple of standard ways to execute GenTargets. First is the "Generate GenTargets" drop-down menu in the RepreZen API Studio tool bar:
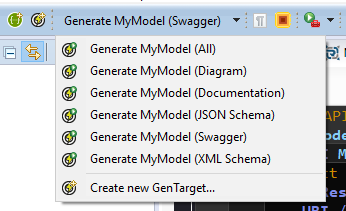
You can select any of the listed options, and the corresponding GenTarget (or all of them if you select the first option) will be executed.
The other way to execute a GenTarget is from the context menu of the GenTarget in the Project Explorer.
Let’s run the Swagger GenTarget and see what happens to our project. Here’s the Project Explorer pane after the GenTarget has completed:
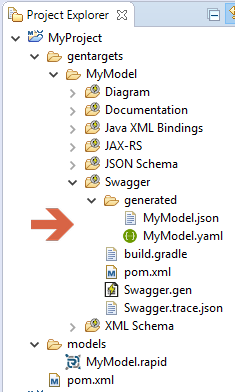
Here we see a new folder, generated, under the Swagger GenTarget. This is where the files
generated by the GenTarget are placed by default. We see here that the Swagger GenTemplate creates
two output files, due to Swagger’s support for both JSON and YAML formats.
In addition, we see a new file, Swagger.trace.json, that was also created under the Swagger
GenTarget, but it’s not in the generated folder. This file contains trace information, which
enables chaining of GenTargets — feeding the output of one GenTarget into another. We’ll see an
example of GenTarget chaining later.
If we now execute the Documentation GenTarget, we’ll see an additional twist. Here’s the partially expanded project tree that results:
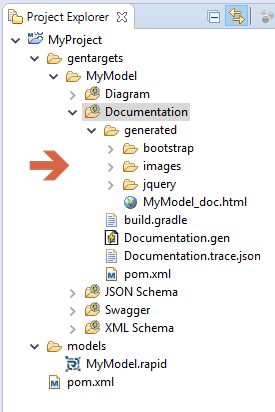
As expected, we now have a generated folder under the Documentation GenTarget, as well as a
trace file. The file that was actually generated from our RepreZen model is MyModel_doc.html. But
there are other items in the generated folder.
It turns out that the HTML generated by the Documentation GenTarget relies on a number of web assets, including images, CSS stylesheets, and Javascript files. None of these depends on our model, hence they were not really generated. Instead, they were copied from an identical structure baked into the Documentation GenTemplate itself. Files that are copied in this fashion are called static resources.
In general, each GenTemplate gives rise to some number of dynamic outputs (files that depend on
the model itself), and some number of static resources, all arranged in some folder hierarchy
starting with the GenTarget’s output folder, which by default is named generated.
Adding a Gen Target (and Resolving Dependencies)
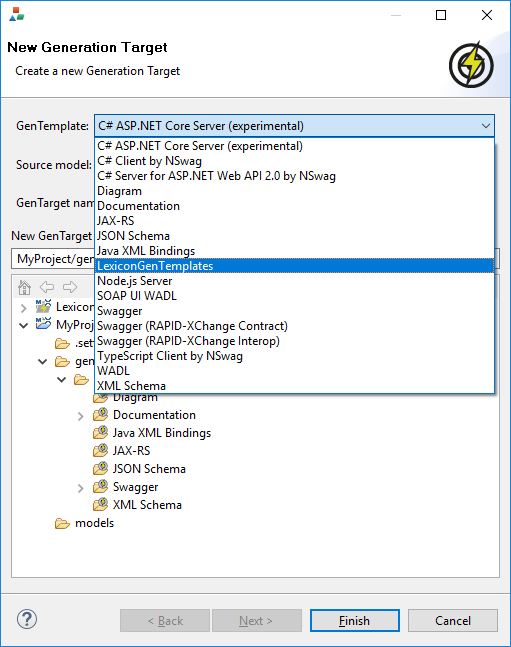
Now let’s look at how we can add GenTargets to an existing model. The easiest way is to click on the "Create a New Generation Target" tool in the RepreZen API Studio tool bar while we’re editing a model file or when a model file is active in the Project Explorer pane. You can also use the final entry in the Generate menu.
The following dialog box apperas, where we can choose which GenTarget we wish to add.
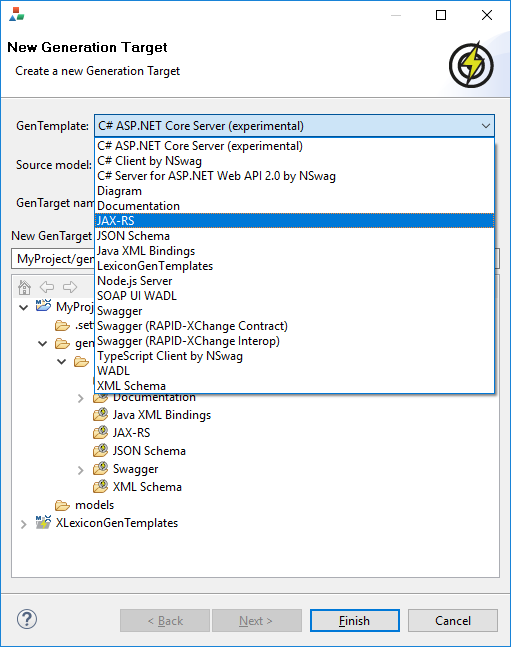
We’ll select the JAX-RS GenTemplate for our new GenTarget, and when we do that we notice that the "Next" button in the dialog box suddenly became active. That won’t happen with every GenTemplate, and we can see what it means by clicking on the "Next" button, leading to another dialog:
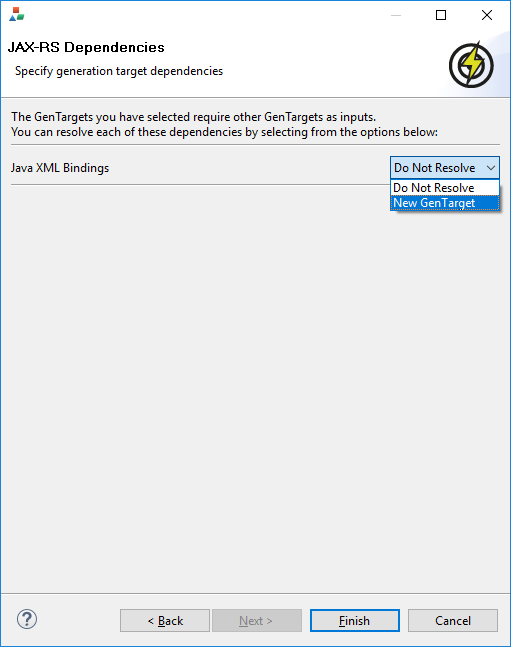
This dialog is alerting us to the fact that the JAX-RS GenTemplate requires a Java XML Bindings GenTemplate on the same model as a prerequisite. This is an example of GenTarget chaining mentioned earlier. In this case, the JAX-RS GenTemplate has been designed to make use of trace information created by the standard Java XML Bindings GenTemplate. To fully configure a JAX-RS GenTarget, therefore, we must resolve the dependency by specifying a Java XML Bindings GenTarget whose trace information will be used by the JAX-RS GenTarget.
There are three possible resolution strategies that may appear in the selection menu appearing for each dependency listed in the GenTarget dependency dialog:
- New GenTarget
-
This option causes the creation of a new GenTarget to resolve the dependency. Selecting this option will cause another instance of the New Generation Target dialog to pop up immediately, already configured with the correct GenTemplate and other defaults. If that GenTarget also has dependencies, the new dialog will itself have an active "Next" button that could be used to create yet more new GenTargets, and so forth.
- Do Not Resolve
-
This is an advanced option that should not be used by most users.
- Use an Existing GenTarget
-
If a GenTarget already exists for the model that is of the type required by the dependency, that GenTarget will also appear as a resolution option for the dependency.
We’ll select the "New GenTarget" option in the selection menu. When we
do that, we will immediately see new a dialog box that will allow us
create a new Java XML Bindings GenTarget. The existing dialog for the
JAX-RS GenTarget is still visible, but it is inoperable until the new
dialog closes out. We will accept all the default settings for our new
Java XML Bindings GenTarget by clicking its "Finish" button. Then we
can also click "Finish" on the JAX-RS GenTarget dialog. When we’re
finished, we will see that both the JAX-RS GenTarget we originally
requested and the Java XML Bindings GenTarget it depends on have been
added to our model project for the MyModel model.
Creating a Gen Template
So far we have seen how to set up built-in GenTargets to generate various types of output in our model projects. But how about if we have a special need. For example, imagine we work at a company that maintains a proprietary lexicon of named elements appearing in APIs throughout the organization, including data types, resources, properties, etc. Perhaps this lexicon is richly linked, and consumes CSV files submitted by various projects. We’d like to contribute information about our RepreZen models. We could automate the creation of our CSV files by creating a custom GenTemplate.
To get started, we’ll use the Xtend Generation Template wizard in
RepreZen API Studio. Select New → Other…, and then choose RepreZen API Studio /
Generation Templates / Xtend Generation Template. The following
dialog will appear:
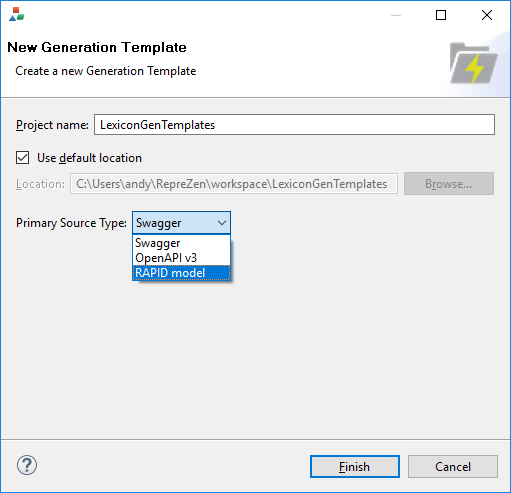
Notice that we’re asked to provide a project name. It turns out that GenTemplates cannot easily live
within a model project, so even if we had invoked New from the context menu of our MyModel
project, this box would be empty. And we wouldn’t be permitted to type in "MyModel" to use the
MyModel project even if we wanted to. Instead, we’ve chosen the name LexiconGenTemplates for our
project, which suggests that we may create multiple GenTemplates related to the lexicon over
time. As it turns out, this project name will also become the name of our single GenTemplate in this
project.[3]
When we click Finish, our new project is created, and RepreZen API Studio busies itself in building the initial
code that it creates for us. Let’s see what the project looks like:
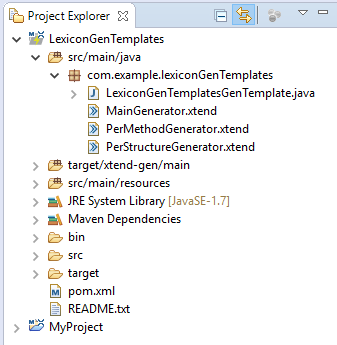
The only thing we’re going to pay attention to right now is
MainGenerator.xtend. This is the file that will define the "meat" of
our GenTemplate. Nearly all the rest of the project content is
boilerplate that you won’t need to worry about unless you choose to
modify your GenTemplate in ways that go beyond what the wizard
provides.
MainTemplate.xtend is an Xtend source file. As stated earlier, Xtend is a programming language
that is based on Java but includes numerous extensions. Here we will be looking at only one of those
extensions: the Xtend templating language. Even if you have little programming experience, you can
create many useful Xtend GenTemplates without learning more about Xtend than we will cover here. If
you would like to learn more, see the Xtend documentation.
A Look At the Initial Template
If we double-click on MainTemplate.xtend in the Project Explorer, we will see the source code in
the main panel of RepreZen API Studio. We’ll take a look at that code, but just as much of what appears in the
overall GenTemplate project is boilerplate, so also is some of the code in this file. We will
currently restrict our attention purely to the Xtend template that appears within the file:
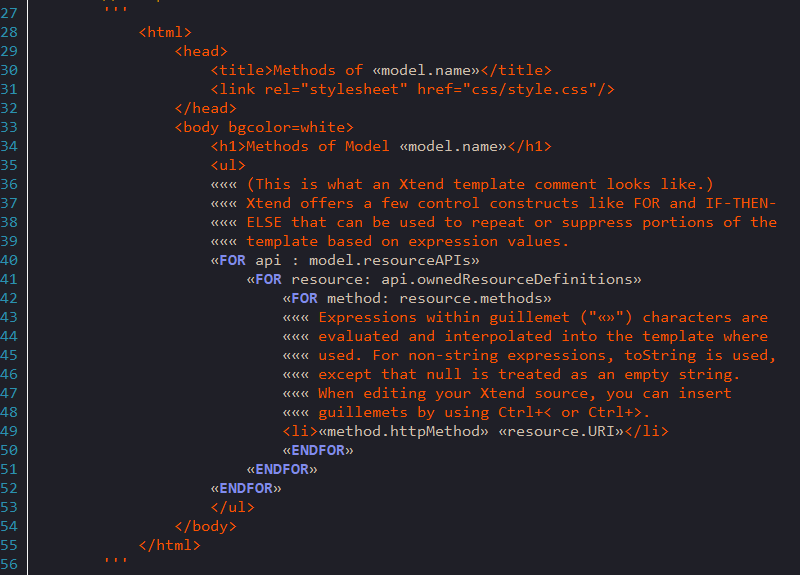
The template starts and ends with three consecutive apostrophes. The initial content of the template will generate a very simple HTML file that includes the name of your model in its title and displays a bulleted list of the resource APIs defined in your model. Of course, that’s not what we need for our Lexicon export, but the wizard has provided a working example that we can change to suit our needs. We’ll use it to take our first look at Xtend, and then we’ll replace it with the template we need for our CSV file.
Most of the content of the template is simply copied to the output file created by the GenTarget, as-is. However, embedded in the template are constructs that are set off by left and right guillemet characters (« and »). These constructs are not copied to the output; rather, they cause dynamic content to be emitted in their place. In addition, Xtend uses triplets of guillemets to enclose code comments, e.g.:
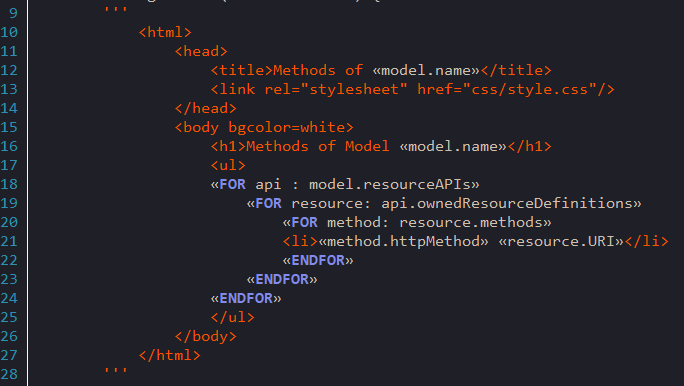
««« This is an Xtend comment and will have no impact on the template outputThis file has many comments, since it’s intended to be instructive to the person who is developing the GenTemplate. We’ll remove those comments for the purpose of this walk-through. Here’s the template without its initial comments:
Two different types of templating construct appear in this template: an "interpolation" and a loop. Xtend also offers an if-then-else construct. Let’s look at examples of the two types of construct in the starter template.
First, we have interpolation, which is just a fancy word meaning that the entire construct will be replaced by the value of whatever is between the guillemets. In general, any valid Xtend expression (and that includes most valid Java expressions) can appear in an interpolation. The value of that expression will appear in the output to take the place of the interpolation construct.
In our case, we have «model.name». When RepreZen API Studio applies this template to a model, a
variable named model will represent the model itself, in the form of an object of type
ZenModel.[4] The ZenModel class contains
a number of properties, one of which is the model’s name. The Xtend expression model.name yields
the model’s name, and that name is what replaces «model.name» in the output
file. Therefore, if we use this GenTemplate on the model we created above, the generated HTML file
will have as its title "Methods of MyModel," thanks to the interpolation construct on
line 12.
Next, we have three instances of the Xtend loop construct: one covering lines 18-24; a second one nested within the first, spanning lines 19-23; a third, inner-most loop on lines 20-23. Lets look at these loops in detail.
«FOR api : model.resourceAPIs»	                        (1)
  «FOR resource : api.ownedResourceDefinitions»	        (2)
    «FOR method : resource.methods»     	        (3)
      <li>«method.httpMethod» «method.httpMethod»</li>  (4)
    «ENDFOR»                                            (5)
  «ENDFOR»                                              (6)
«ENDFOR»                                                (7)
thru |
The outer loop introduces the variable
|
||
thru |
The second loop introduces a new variable,
|
||
thru |
The third loop introduces a new variable,
|
||
Finally, we have an interpolation construct that emits the HTTP operation name and the resource URL for each method encountered. |
The upshot of these three loops is that the information about every method defined our model will appear in an itemized list. In our case, in our untouched model, we would see four methods—two each for our two defined resources.
But What About Our Lexicon?
Our goal was not to create an HTML list of resource names, but to generate data to be fed into our enterprise lexicon. So let’s remove the initial template created for us by the wizard, and create the template we really want.
Our first job is to remove the contents of the existing template — that is, everything between the opening triple-apostrophe and the closing triple-apostrophe. We’re left with something that looks like this:
override generate(ZenModel model) {
    '''
    '''
 }
Before we go any further, we should change the configuration of our
GenTemplate so that it will generate files with names like
MyModel.csv instead of MyModel.html. That’s specified in a file
named LexiconGenTemplatesGenTemplate.java that appears in the same
folder as the MainTemplate.xtend file that we’ve been working on. Go
ahead and open it in RepreZen API Studio. Here’s what it looks like with comments
removed:
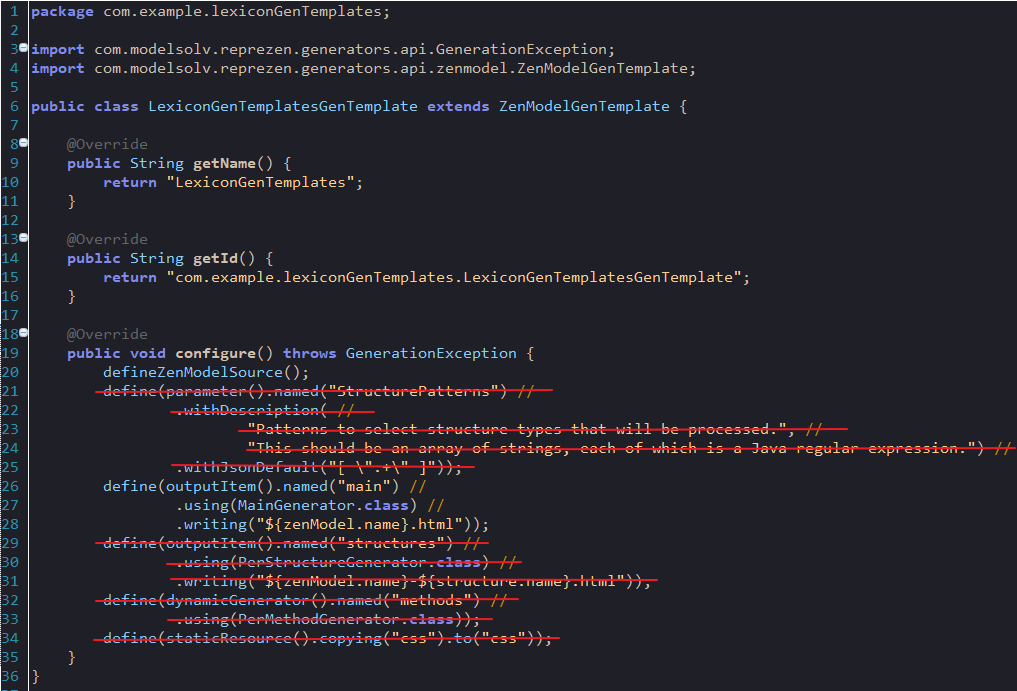
This class illustrates features we’re not using, so we’ll also remove the struck-out lines in the image above, leaving us with this:
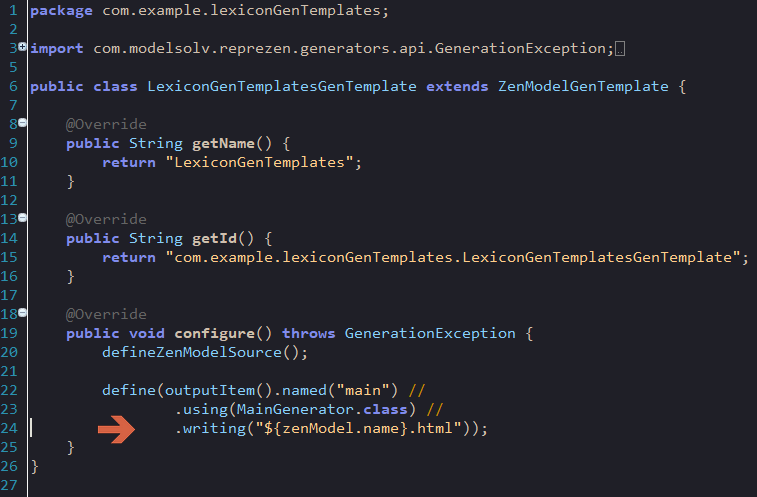
The configure method in this class provides information about
individual generators that should be run when the GenTemplate is
executed. Our MainGenerator Xtend class is the only one we need
to run.
You can see where this generator is configured with an output file
name ending with .html. We’ll change that to .csv so the file will
be understood by our lexicon system. Here’s how that code ends up
looking:
define(outputItem().named("main") //
	.using(MainGenerator.class) //
	.writing("${zenModel.name}.csv"));
Once you are finished, save your changes and go back to the editor where we were working on
MainGenerator.xtend.
Now let’s start filling in what we really intend to show up in our generated CSV file. For starters, lets assume that our file will contain an initial row containing column names. This requires nothing more than typing the text of that line directly into our template:
override generate(ZenModel model) {
  '''
    Name,Type,Parent,ParentType,Model,Documentation
  '''
}| Xtend has rules that determine which white-space (blanks, line ends, etc.) are copied from the template to the output. Initial indentation is not copied, so in our output, "Name" will appear in the first column. In addition, our initial new line will be omitted. For details see the Xtend template documentation. |
Now let’s start filling in some information from our model. We’ll start with a record for our model as a whole, by adding the following line to our template:
«model.name»,Model,,,«model.name»,«model.documentation.text»| To insert guillemets in RepreZen API Studio, hold the Control key down while hitting the space bar. If that doesn’t work, it’s probably because your insertion point is not positioned in a place where a pair of guillemets would make sense. You can also press "<" or ">" while holding down the Control key to insert left or right guillemet, regardless of whether that makes sense. (These do not appear to work on OS X.) |
Our model name will appear in the first column of this record, and "Model" will appear in the second. Our model has no parent, so the parent fields are left blank. The model in which our model appears is, of course, our model; so we repeat the model name in the "Model" column.
There is one problem with this line: If the model lacks top-level documentation, this GenTemplate
will fail. The problem is that in that case, model.documentation will have a null value, and
therefore, trying to retrieve its text property will fail.
Fortunately, Xtend includes an extremely useful "guard" syntax to avoid references to properties of
null values: instead of model.documentation.text we can write model.documentation?.text. The
question mark causes a following property access to be ignored if the prior value happens to be
null. In that case, the value of the overall expression is null. The whole expression is equivalent
to the following java expression:
model.documentation != null ? model.documentation.text : nullWith this modification, this line in our template now reads:
«model.name»,Model,,,«model.name»,«model.documentation?.text»Next, we’ll create records for all the resource APIs defined in our model, using the same
resourceAPIs property of ZenModel as we saw in the initial template:
The sample model created by the RepreZen Project wizard does not include any documentation
comments, so the Documentation column will always be empty when our template is applied to that
model. You can add comments of the form /** documentation here */ in front of many of the model
elements, and they will be picked up by our template.
|
«FOR api : model.resourceAPIs»
  «api.name»,ResourceAPI,«model.name»,Model,«model.name»,«api.documentation?.text»
«ENDFOR»
Everything should be fairly self-explanatory in this line.
We also want records for all the resources defined for each resource API. For this we’ll want another loop, nested within the one listed above. This is the same strategy as we saw in the initial template. We’ll use something like this:
«FOR resource: api.ownedResourceDefinitions»
  «resource.name»,???,«api.name»,ResourceAPI,«model.name»,«resource.documentation?.text»
«ENDFOR»
Everything looks normal here except the value we’re placing in the Type column, which appears as
"???" above. The problem is that we can’t just use a fixed value like ResourceAPI, as we did for
the resource API record, because resources come in two varieties: object resources and collection
resources. Here we can make use of the Xtend if-then-else construct, as in:
«IF resource instanceof CollectionResource»
  CollectionResource
«ELSEIF resource instanceof ObjectResource»
  ObjectResource
«ENDIF»
If we inserted the above into our template, we’d get the right values — "CollectionResource" or "ObjectResource" according to the actual type of the resource — in our CSV file. However, in its current form, it would also introduce line breaks that would mess up our CSV file. In most cases, Xtend "does the right thing" with white space and line breaks appearing in templates. But occasionally we need to take direct control.
One way would be to crush the entire if-then-else construct into a single line:
«IF resource instanceof CollectionResource»CollectionResource«ELSEIF resource instanceof ObjectResource»ObjectResource«ENDIF»This will work, but it’s pretty ugly and hard to understand, especially since we need to stick that whole thing into the middle of an already complicated line in our template. An alternative is to place the guillemet characters strategically so that all the line breaks in our template occur within the guillemets, like this:
«IF resource instanceof CollectionResource
  »CollectionResource«
ELSEIF resource instanceof ObjectResource
  »ObjectResource«
ENDIF»
This will work just fine, but it still will look pretty bad when we cram it into our overall template. Thankfully, Xtend is embedded in the powerful Java programming language, so we can do things like defining methods to handle tasks like what our if-then-else snippet is doing. Here’s how that looks in Xtend:
def getType(ResourceDefinition resource) {
    if (resource instanceof ObjectResource) {
       return "ObjectResource"
    } else {
       return "CollectionResource"
    }
}
We’ve now created a method called getType that we can apply to any
resource, and it will yield the type string that we’re after. We can
use this new method in our template via interpolation :
«FOR resource: resourceAPI.ownedResourceDefinitions»
  «resource.name»,«resource.type»,«resourceAPI.name»,ResourceAPI,«model.name»,«resource.documentation.text»
«ENDFOR»
You may notice that we have resource.type in our template, not resource.getType. If we name
a method something like getXxx it can be invoked from an object as if it were a property of that
object, named xxx.
|
We will stop here, but we could, if we wished, continue navigating through our model to emit additional items for our lexicon, including resource methods and their parameters, data types and their properties, and so forth.
Our Finished Template
With this we can now show our final version of MainTemplate.xtend:
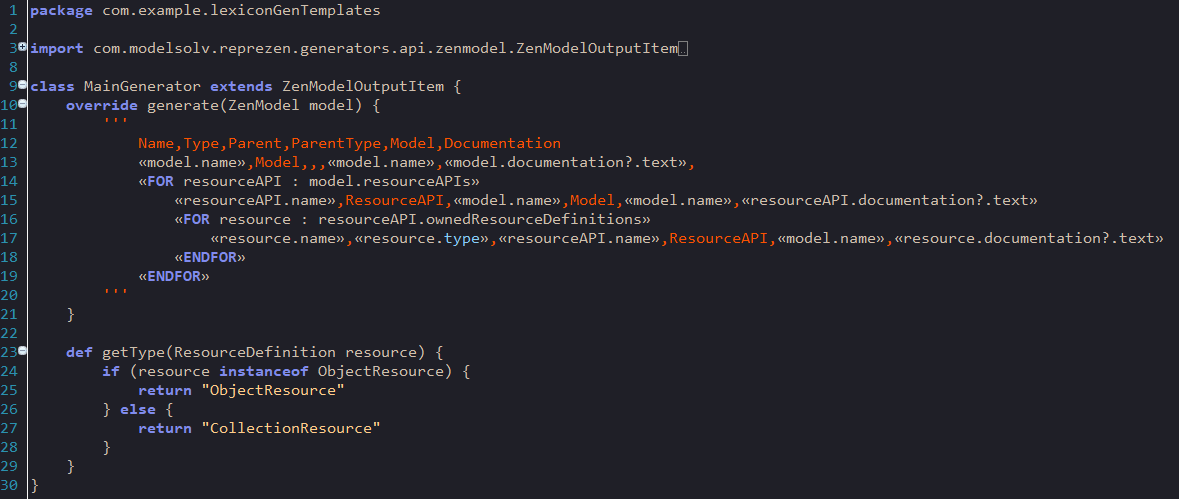
Here it is in a form that can be copied and pasted (but is not as nicely formatted as the above), in case you want to use it to try things out in RepreZen API Studio:
package com.example.lexiconGenTemplates

import com.modelsolv.reprezen.generators.api.zenmodel.ZenModelOutputItem
import com.modelsolv.reprezen.restapi.CollectionResource
import com.modelsolv.reprezen.restapi.ObjectResource
import com.modelsolv.reprezen.restapi.ResourceDefinition
import com.modelsolv.reprezen.restapi.ZenModel

class MainGenerator extends ZenModelOutputItem {
    override generate(ZenModel model) {
        '''
            Name,Type,Parent,ParentType,Model,Documentation
            «model.name»,Model,,,«model.name»,«model.documentation?.text»,
            «FOR resourceAPI : model.resourceAPIs»
                «resourceAPI.name»,ResourceAPI,«model.name»,Model,«model.name»,«resourceAPI.documentation?.text»
                «FOR resource : resourceAPI.ownedResourceDefinitions»
                    «resource.name»,«resource.type»,«resourceAPI.name»,ResourceAPI,«model.name»,«resource.documentation?.text»
                «ENDFOR»
            «ENDFOR»
        '''
    }

    def getType(ResourceDefinition resource) {
        if (resource instanceof ObjectResource) {
        	return "ObjectResource"
        } else {
        	return "CollectionResource"
        }
    }
}
You may notice that the part of this file that we have been ignoring (outside the template and our
added functions) has changed. There are more import statements than there used to be. These are
required because we introduced into our code references to types like ReferenceAPI,
ResourceDefinition, etc. The import statements are what enable the Xtend (and Java) compiler to
know what to make of these types. The easiest way to manage imports is using a built-in feature of
RepreZen API Studio to fix your imports whenever you reference a type that is not already imported. Just type "O"
(the letter) while holding down the Control and Shift keys (Command and Shift on OS X). Until you
do this, your project will show errors involving the types we introduced, and you won’t be able to
use your GenTemplate.
Once we have this GenTemplate defined, we can add a corresponding GenTarget to our model just as we
did earlier when adding the WADL GenTarget. This time, the dialog box will include our new
GenTemplate, named LexiconGenTemplates.
You can now execute that GenTarget, and you should find the file MyModel.csv in the generated
folder for that template, with the following contents:
Name,Type,Parent,ParentType,Model,Documentation MyModel,Model,,,MyModel,
MyModelAPI,ResourceAPI,MyModel,Model,MyModel,
MyModelObject,ObjectResource,MyModelAPI,ResourceAPI,MyModel,
MyModelCollection,CollectionResource,MyModelAPI,ResourceAPI,MyModel,
As mentioned earlier, the default model created by RepreZen API Studio does not include any documentation, so
the Documentation column is empty in this file. However, if you were to add documentation to the
model, or the MyModelAPI resource API, or to either of its resources, you would see that
documentation in the resulting file.
|
We have not taken care to quote items in our generated CSV file, so if we had commas or
multiple lines in any documentation string, we would end up with a broken or unreadable CSV file. We
could define a method to quote our documentation as required for inclusion in a CSV file, and invoke
that method with something like xxx.documentation?.text?.quote. (Alternatively, we could define a
method called getDoc that performs the documentation?.text access as well as quoting the result,
and then replace our documentation expressions with xxx.doc.)
|
1. Note that the Xtend language is very nearly a superset of Java, so if you are a Java programmer you can use most of what you know in your Xtend classes. And you can intermingle pure Java classes at will, and use all available Java libraries without any compatibility issues. This is guaranteed by the fact that Xtend classes are not actually compiled, but are rather transformed into pure Java classes, which are then compiled by the Java compiler.
2. Building on the footnote regarding Xtend in the context of GenEngine, we can further point out that it is perfectly possible to code an Xtend GenTemplate completely in Java. Indeed, some of the GenTemplates built into RepreZen API Studio are pure Java.
3. The wizard is not currently capable of adding a new GenTemplate to an existing project, but that can be done manually.
4. The name
ZenModel reflects old terminology related to RAPID-ML models. Some of our APIs have not yet been updated to reflect our new terminology.