java -jar ~/git/swagger-codegen/modules/swagger-codegen-cli/target/swagger-codegen-cli.jar meta -o ~/LexiconSCGentemplates -n lexiconSCGenTemplate -p my.orgCreating a Custom Swagger GenTemplate
In Introduction to Code Generation in RepreZen API Studio we walked through a scenario that included the creation of a custom
GenTemplate using the New GenTemplate wizard. From a fully working "starter" implementation, we
modified an Xtend template that formed the basis of the implementation, and we altered the output
file extension configured for the GenTemplate from .html to .csv. In the end we had created a
GenTemplate that captures model information in a CSV format.
In that exercise, the GenTemplate was designed to operate on RAPID-ML models. The exact same approach can be used to create Xtext-based GenTemplates that operate on Swagger models. The starter implementation will differ in certain ways — most evidently in the Xtext template itself, which will reflect the Swagger Models API rather than the RAPID-ML Model API.
Using the Swagger Codegen Framework
Another option, for those familiar with the Swagger Codegen framework, is to build a custom Swagger Codegen (SCG) module in a Java project within the RepreZen API Studio workspace. Any such module will automatically be discovered and "wrapped" as a GenTemplate by RepreZen API Studio, and you can apply them to your Swagger models by creating GenTargets.
The steps for creating a custom SCG module, detailed below, are:
-
Use the SCG command line interface to create a skeleton for your new module.
-
Import that skeleton into RepreZen API Studio as a new Java project.
-
Modify the skeleton Java code and Mustache templates to suit your needs.
-
See that your new module is now listed with the standard SCG modules in the New GenTemplate wizard.
We will, in the course of describing these steps in detail, work through an example that will mimic
the LexiconGenTemplates custom GenTemplate created in Introduction to Code Generation in RepreZen API Studio. Please
review that document to learn the motivating hypothetical scenario.
| Some of the details in this section apply to version 2.1.4 of SCG, and include information from available documentation and also from code inspection. RepreZen API Studio currently uses release 2.1.4 but will soon migrate to release 2.1.5. At that time we will update this document as needed. |
Creating the SCG Skeleton
The SCG Command Line interface (CLI) includes a command, meta, which can be used to create the
skeleton for a new SCG module. The CLI is embedded in the Java command line, with the SCG
executable jar file and the class that implements the selected SCG module as command-line
arguments.[1]
Our first step invokes the SCG meta command to create a skeleton project. The command arguments we
will use are:
-o dir-
Specifies the directory where the skeleton project will be created; default is the current directory.
-n name-
Specifies the name for the new SCG module, which is put to many uses in the skeleton, some of which imply restrictions on the name that are not enforced by SCG. These include:
-
It is the advertised name of the module (i.e. the value its
CodegenConfig#getName()method returns). The CLIgeneratecommand’s-l(--lang) option maps to these names. -
It is incorporated into the name of the generator class, which is the name value with its first character upper-cased, concatenated with
Generator. E.g.-n myModulewould generate a class namedMyModuleGenerator. -
It is incorporated into the advertised description of the model (the value returned by
CodegenConfig#getHelp()). -
It is incorporated into the name of the default output folder used by the module. (This is unused when the module is executed in RepreZen API Studio as a GenTemplate, since the output directory is in that case specified in the GenTarget.)
-
It is used as the template directory name. This directory will appear as a top-level Java resource directory in the generated project.
-
-p package-
Specifies the package in which the generator class will reside. The default is
io.swagger.codegen.
In preparation for this step we need to install the Swagger Codegen Client jar file. One way to do
that is to clone the swagger-api/swagger-codegen
git repo, checking out version 2.1.4 (using the git tag v2.1.4) and then running mvn package
from the working tree root. This will build the needed jar file in
modules/swagger-codegen-cli/target/swagger-codegen-cli.jar.
To execute this step we’ll need to launch a command shell for our system. For simplicity, we’ll
specify paths relative to our home directory using the linux ~ designator. Modify the paths in
your command as needed, depending on where your swagger-codegen git clone is located, and where
you want the skeleton to be created.
After all the foregoing, this step finally comes down to a single command, which will create our skeleton:
Importing the Skeleton into RepreZen API Studio
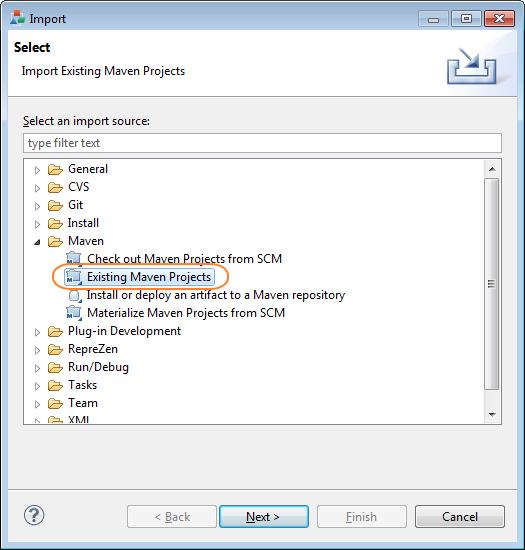
The skeleton is configured as a Maven project, and RepreZen API Studio includes the capability of importing Maven projects into the workspace. From the menu bar, select File → Import…, then select Maven → Existing Maven Projects in the dialog that appears. Click Next.
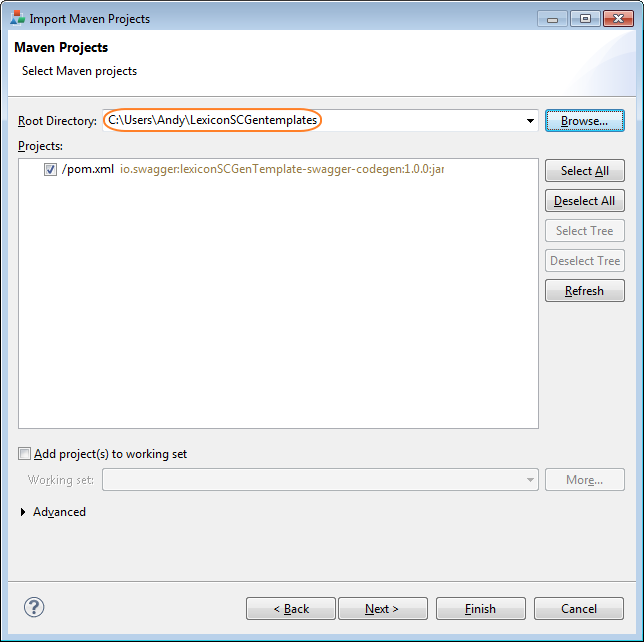
Browse to the output folder you specified for the SCG meta command, and you should see the Maven
pom.xml file for the skeleton in the projects list. With that entry checked, click Next.
Click Finish on the final panel, and RepreZen API Studio will complete the import and immediately build the new project.

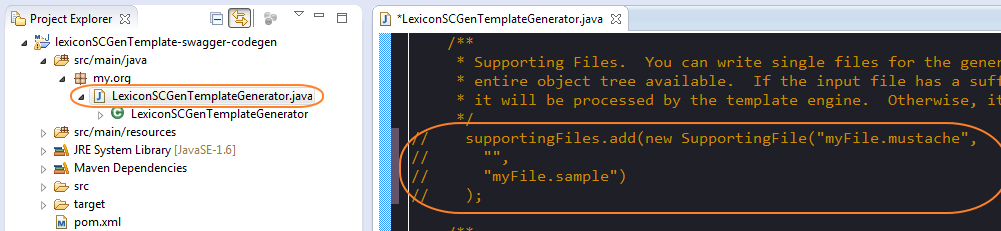
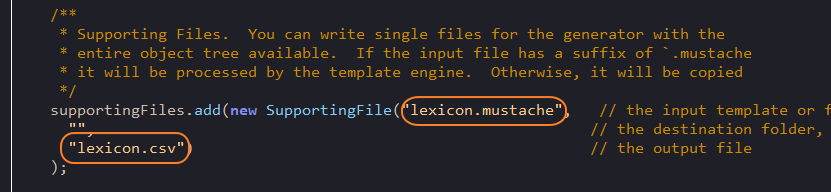
At this point your skeleton is complete, but not quite functional. The problem is that the Java class that implements your new generator configures a "supporting" template to run on your model, but the skeleton does not actually include the needed template file. You can fix this by removing or commenting out the problematic java code. In the following image we show the code commented out.
With this change, your custom module is completely functional, if not very useful. Go ahead and try executing it with a Swagger model of your choice, by creating and running a GenTarget.
Modifying the Skeleton
Now we’ll modify our skeleton project so that it generates a CSV file listing all the operations defined by the Swagger model.
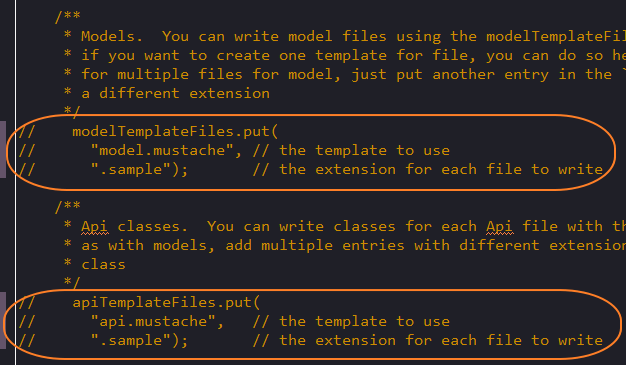
We won’t be creating any API or model files, for which the skeleton makes special provision, so we’ll comment out the lines that declare the corresponding templates. You can delete these lines, but we’ll comment them out to make our screen shots understandable.
Next we’ll uncomment that code we commented out earlier, because a "supporting" template is a good choice for our CSV file generator. After reviving that code, we’ll change the template and output file names to choices that are appropriate for our task.
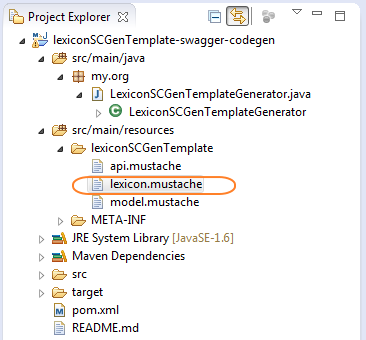
Next, we’ll create a new Mustache template file in the resources source tree. Again, you could
also delete the existing templates, but we’ll leave them in place.
Finally, we’ll enter code into the new template file to produce our desired output. We will not go into any details of the Mustache templating language, or the structure in which the Swagger model is presented to the template by the Swagger Codegen framework. You can read about Mustache here.
The structures passed to the Mustache templates do not appear to be documented, and they differ
considerably from both the structure of a Swagger Spec and from that presented by the
Swagger Models
Java API. To get some insight into the structure, one helpful resource is the console output created
when an SCG module is executed with the debugModels, debugOperations, and debugSupportingFiles
Java system properties set. The output shows the precise JSON structure on which the model, api, and
supporting templates, respectively, will operate.[2]
Here is our final template:
Name,Type,Parent,ParentType,Model,Documentation
{{appName}},Model,,,{{appName}},{{appDescription}}
{{#apiInfo}}{{#apis}}{{#operations}}{{#operation
}}{{nickname}},Operation,{{appName}},Model,{{summary}}
{{/operation}}{{/operations}}{{/apis}}{{/apiInfo}}
Note that this template looks particularly cramped compared to most that you’ll see in SCG modules. The reason is the care that we must take to avoid unintended whitespace from appearing in our output, including blank lines. We had some similar difficulties in the Xtend template we created in Introduction to Code Generation in RepreZen API Studio. This focus on whitespace reflects an unusual requirement of our hypothetical use-case.
Using Your New SCG Module
If you’ve carefully followed the steps in this guide, you should now have a fully operational custom SCG module, and you should see it listed as an available GenTemplate in the New GenTarget wizard.
Applying this new GenTemplate to the PetStore model (available from the RepreZen API Studio Examples Wizard) yields the following output:
Name,Type,Parent,ParentType,Model,Documentation
Swagger Petstore,Model,,,Swagger Petstore,
listPets,Operation,Swagger Petstore,Model,List all pets
createPets,Operation,Swagger Petstore,Model,Create a pet
showPetById,Operation,Swagger Petstore,Model,Info for a specific pet
1. Although SCG is published with several convenience scripts that invoke the CLI on specific sample models embedded in the project, it does not provide a general-purpose script to invoke the CLI. Such a script would be simple to create, but in this guide we will show the full Java command lines.
2. Recall that in RepreZen API Studio you can arrange for system properties to be set when executing an SCG-based GenTemplate by providing a value for the
swaggerCodegenSystemProperties parameter in the GenTarget file.